EQ Techniques for Highlighting the Best Frequencies in Instruments

Equalization (EQ) is one of the most powerful tools in mixing. When used correctly, it allows you to shape each instrument’s sound to fit perfectly in the mix. However, EQ can also be overwhelming if you’re not sure which frequencies to focus on. In this guide, we’ll explore how to highlight the best frequencies of different instruments, ensuring each one shines without clashing with others.

You May Like

Understanding Frequency Ranges for Different Instruments

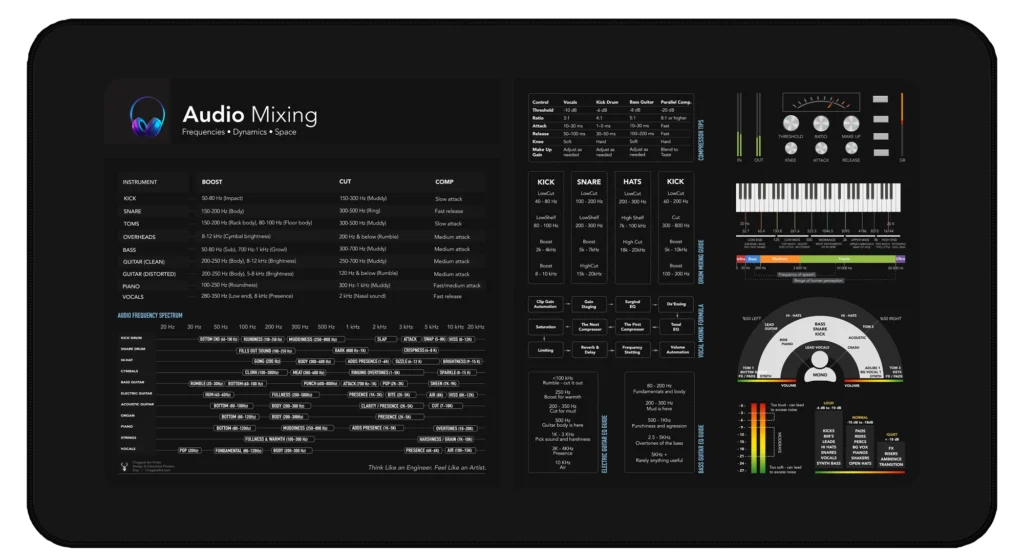
Every instrument has a unique frequency range, and knowing where these ranges lie is the first step in EQ’ing them effectively. Here’s a general overview of where to find key frequencies for common instruments:

Kick Drum: 50 Hz – 100 Hz (low end), 2 kHz – 4 kHz (attack and presence)

Bass: 40 Hz – 200 Hz (sub-bass to fundamental frequencies), 700 Hz – 1 kHz (midrange warmth)

Vocals: 100 Hz – 300 Hz (body), 2 kHz – 5 kHz (presence), 6 kHz – 8 kHz (air)

Guitar: 80 Hz – 120 Hz (low-end), 1 kHz – 3 kHz (midrange), 3 kHz – 5 kHz (presence)

Piano: 30 Hz – 200 Hz (low end), 1 kHz – 5 kHz (clarity), 5 kHz – 10 kHz (brightness)

By understanding these ranges, you can highlight or carve out specific frequencies to ensure each instrument cuts through the mix clearly.

1. Boosting the Sweet Spot

Every instrument has a “sweet spot” where its most pleasing and expressive frequencies lie. For example:

Vocals: Boosting around 3 kHz to 5 kHz enhances vocal clarity and helps them stand out in a dense mix. A slight boost in the 8 kHz range can add air and presence.

Snare Drum: The snare’s presence lies between 2 kHz and 5 kHz. A small boost here can make it cut through the mix with more punch.

Guitar: To highlight a guitar’s midrange, boost around 1 kHz to 2 kHz. For more “bite,” 3 kHz can add the necessary edge.

Boosting in these areas adds definition and helps the instrument come alive in the mix. Be careful, though—boost too much, and the mix can become harsh. Always make adjustments in small increments.

2. Cutting Unwanted Frequencies

While boosting can make an instrument stand out, cutting problematic frequencies is equally important. For instance:

Low-End Mud: Too much low-end energy in certain instruments like vocals, guitars, or even pianos can lead to a muddy mix. A high-pass filter can help clear up unnecessary low frequencies. For example, cutting below 80 Hz on vocals can reduce rumble and make the mix clearer.

Boxiness in Guitars: Many electric guitars have a boxy sound in the midrange (around 300 Hz to 600 Hz). A gentle cut in this range can clean up the sound and make room for other instruments.

Use subtractive EQ to remove frequencies that clutter the mix. By cutting carefully, you allow space for other elements to shine.

3. Using Shelving EQ for Tonal Balance

Shelving EQ can be used to adjust the overall tone of an instrument. For example:

Bass and Kick Drum: You can add more warmth to your bass and kick by applying a low-shelf boost around 60 Hz. This will give the low-end more power without overcrowding other elements.

Highs on Guitars: A high-shelf boost at 8 kHz or above can add sparkle and air to a guitar without making it too sharp.

Shelving EQ allows you to shape the overall tonal character of an instrument, giving it more presence or warmth depending on the needs of the mix.

4. Using Dynamic EQ for Frequency Management

Dynamic EQ is a more advanced technique that can be very effective in controlling problematic frequencies without making permanent changes to the overall sound. Unlike static EQ, dynamic EQ adjusts in real-time, applying changes only when a specific frequency exceeds a set threshold.

For example, if a vocal has a piercing 3 kHz frequency during certain words, a dynamic EQ can automatically reduce this frequency without affecting the rest of the performance. This provides control over specific problem areas without affecting the overall balance of the mix.

Dynamic EQ is especially useful for instruments with fluctuating frequencies, such as vocals or brass sections, allowing you to keep the mix clean while maintaining a natural sound.

5. Creating Space with EQ in the Mix

One of the keys to a great mix is ensuring that each instrument has its own space. By carving out frequencies with EQ, you allow instruments to sit properly in the mix without stepping on each other. For example:

Piano and Vocals: Since both piano and vocals occupy a similar frequency range, you might need to cut some midrange from the piano (around 2 kHz) to give the vocals more room.

Drums and Bass: The kick and bass drum often share the same low-end frequencies, so carving out space for the kick (around 60 Hz) and cutting some of the unnecessary bass frequencies (below 40 Hz) can help them work together cohesively.

EQ can help create a “sonic space” where each instrument can be heard clearly without interfering with others.

Final Thoughts: Mastering EQ Techniques

Mastering EQ is essential for any mix. By understanding the frequency ranges of different instruments, and applying techniques like boosting sweet spots, cutting unwanted frequencies, and creating space, you can create a balanced and professional-sounding track. Keep in mind that EQ should be used sparingly and with intention—subtle changes can make a huge difference.

Need a visual reference for frequencies? Check out the Audio Frequency Spectrum Poster for a detailed breakdown of frequency ranges across different instruments. Perfect for mixing and mastering your tracks!

Leave a Reply

© 2017-2024, Chagatai Creative Studio LLC.

The New Marketplace

Get %50 with this code:

WELCOME50

Use this code at checkout page

0