Shop
Featured
Special Series
Champaigns
- Monochrome Art - Buy 3 Pay 2
- Students Get %20 Off
Shop
Home Collections
Life Style & Hobby
Info
Shop
Featured
Special Series
Champaigns
- Monochrome Art - Buy 3 Pay 2
- Students Get %20 Off

When it comes to audio mixing, vocals often take center stage. They’re the emotional core of a song, the connection between the artist and the listener. But achieving professional, polished vocals isn’t always straightforward. One tool that can transform raw vocal recordings into something magical is compression. Let’s dive into what compression is, why it’s crucial for mixing vocals, and how you can use it effectively to take your mixes to the next level.
Speed up your FL Studio, Logic Pro, Ableton, Bitwig, Cubase, or Avid Pro workflow. Our premium desk mats put every essential shortcut right in front of you—so you can mix, produce, and create without missing a beat.
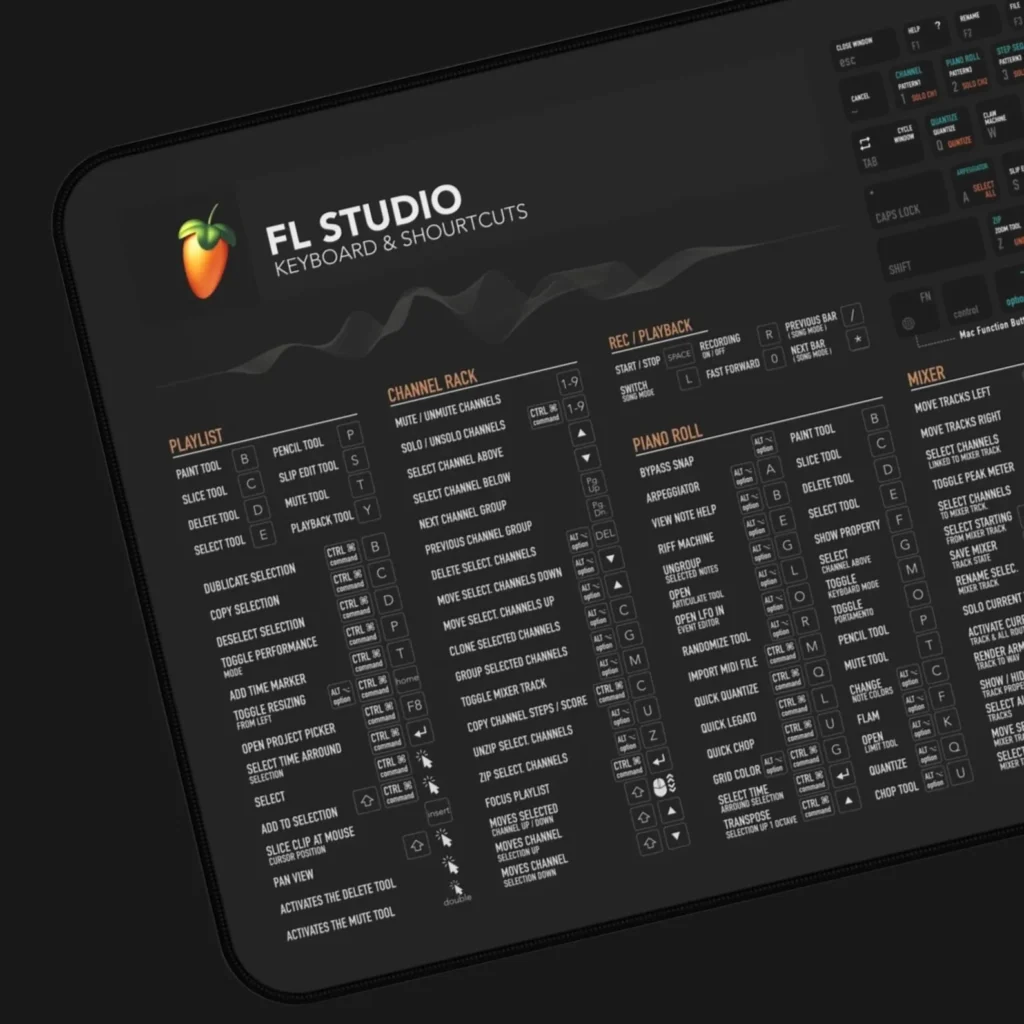
FL Studio, Logic Pro, Ableton, Bitwig, Cubase, or Avid Pro all shortcuts
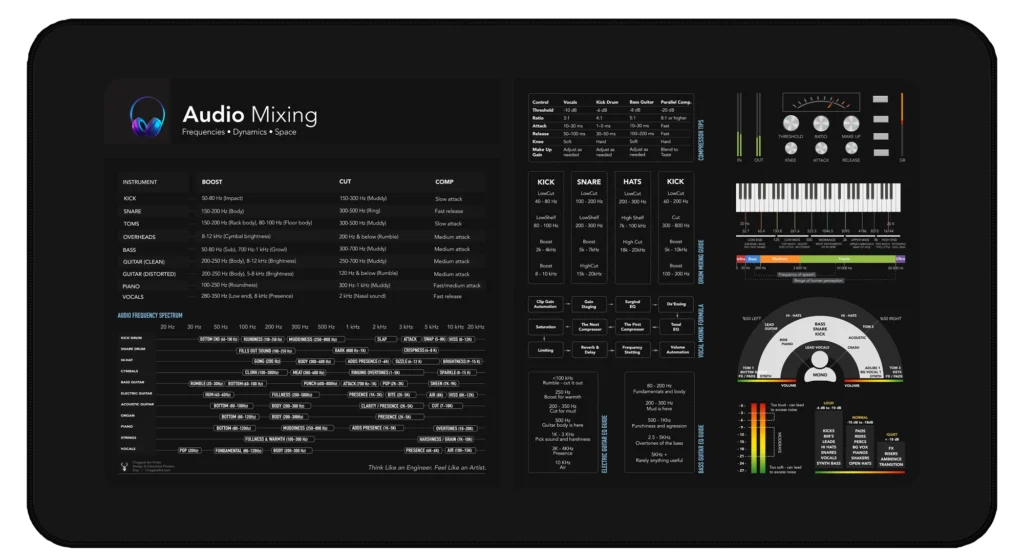
Master EQ, compression, panning, and frequency balance at a glance. The Audio Mixing Cheat Sheet Deskmat keeps every pro tip right under your hands—so you can focus on creating perfect mixes, faster than ever.
In simple terms, a compressor reduces the dynamic range of an audio signal. Dynamic range refers to the difference between the loudest and quietest parts of a vocal recording. Without compression, vocals can sound inconsistent—some words might be too loud, while others get buried in the mix. Compression ensures every syllable and phrase sits neatly in the mix, making the performance feel cohesive and professional.
Think of compression as your invisible assistant, subtly controlling the volume fluctuations so the vocal stays present without overpowering other elements of the track.
If you’re new to audio mixing, staring at compressor knobs might feel intimidating. Here’s a step-by-step guide to get you started:
1. Threshold: This sets the volume level at which the compressor kicks in. Start by setting it just below the loudest part of the vocal.
2. Ratio: This determines how much the signal is compressed. For vocals, a ratio of 3:1 or 4:1 works well for a natural sound.
3. Attack: The attack controls how quickly the compressor reacts. A slower attack lets the initial transients (like the “T” or “P” sounds) come through, adding energy to the vocal.
4. Release: This determines how quickly the compressor stops working. A faster release keeps the vocal lively, while a slower release smooths it out.
5. Make-Up Gain: After compression, the vocal might sound quieter. Use this to bring the overall level back up without clipping.
The key to using compression effectively is subtlety. Over-compressing vocals can make them sound flat and lifeless, while under-compressing can leave them uncontrolled. Always trust your ears and compare your compressed track to the raw recording.
For example, if your vocalist has a dynamic performance with soft whispers and powerful belting, compression can tame the peaks without losing the emotional depth of the delivery.
Now that you understand the basics of compression, why not take your mixing skills to the next level? Whether you’re a beginner or a seasoned producer, having a visual guide at your side can make all the difference.
📌 Check out our Audio Mixing Cheat Sheet Poster!
This poster simplifies complex mixing concepts, including compression, EQ, and reverb, into an easy-to-understand guide. Perfect for hanging in your studio or keeping as a quick reference. Master your mixes with confidence!
While compression is powerful, it’s easy to make mistakes. Here are a few common pitfalls:
•Over-Compression: Too much compression can squash the life out of your vocal. Aim for transparency unless the genre calls for a heavily compressed sound.
•Ignoring Context: Always listen to the vocal in the mix. What sounds good soloed might not work with the rest of the track.
•Poor Gain Staging: Make sure the input and output levels are balanced to avoid distortion or clipping.
Different music genres require different compression styles. For example:
•Pop and R&B: Smooth compression with a slower attack for polished, radio-ready vocals.
•Rock and Metal: Faster attack and higher ratio to keep aggressive vocals controlled.
•Acoustic or Jazz: Subtle compression to preserve the natural dynamics of the performance.
It reduces dynamic range so quiet parts are more audible and loud peaks are controlled, keeping the vocal steady in the mix.
Try threshold just below peaks, 3:1–4:1 ratio, medium‑slow attack, medium release, and adjust make‑up gain to match level.
Slower attack lets transients (“T”, “P”) pass for energy; faster attack tames spiky consonants. Pick based on the song’s style.
Often 3–6 dB on average. If you hear pumping or a lifeless tone, you’re likely over‑compressing.
Over‑compression. It flattens tone and kills emotion. Always A/B with the raw track and set levels with good gain staging.
Chagatai Creative Studio LLC, operating under the brand name Chagatai Art.
© 2017-2024, Chagatai Creative Studio LLC.
1 Comment
Awesome info